Setting up Your email Template in Microsoft Outlook Express
The following instructions detail how to save an email template into your email application for use when sending HTML emails to your contacts.
Step One - Save the template to your Hard Drive
Before starting this tutorial please ensure you have saved the email.html file somewhere on your hard drive. You will need to make a note of where it is saved so you can find it later.
Step Two - Setting up Outlook Express
The following instructions will guide you through this process. Please note that we are going to have you set this up as what Microsoft calls a "SIGNATURE", rather than setting it up as what Microsoft calls "STATIONERY". So, don't be alarmed when we ask you to work with the "signature" settings, and use them to locate and apply a "stationery" file.
Prior to starting, you will need to determine what version of Outlook Express you are using. If you do not know, from the top menu bar, click HELP and pull down to ABOUT. Clicking ABOUT will give you the version number. If you are using Outlook Express Version 4 or Outlook Express 97, please skip directly to step 12.
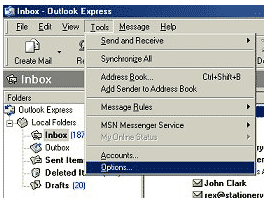
1. From the main Outlook Express page, click TOOLS from your top menu bar and pull down to OPTIONS:
2. In the OPTIONS dialog box, click the "tab" called COMPOSE. Note that in the middle of the COMPOSE tab is a section devoted to STATIONERY. Make sure the checkbox labeled MAIL is UNCHECKED.

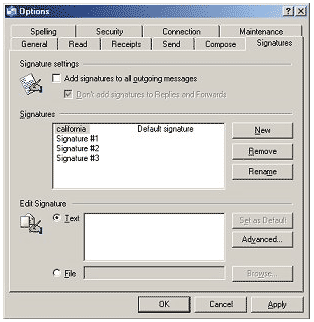
3. Next, click the SIGNATURES tab at the top of the OPTIONS dialog box. You'll see the following (note: if the white box in the middle is empty, that's perfectly fine):
4. Click the NEW button. Then click the button called FILE towards the bottom where it says Edit Signature. Your screen will look like:
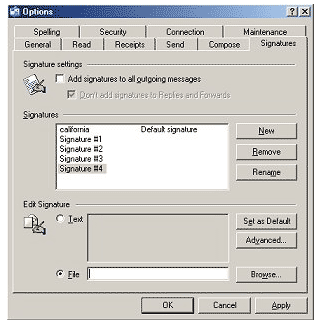
5. At the bottom of the dialog box, click BROWSE and then browse to the file email.html you saved on your hard drive at STEP ONE

6. Click APPLY
7. Select the Signature Name you just created and click RENAME, enter a name for this that you will recognise and then click OK
If you are sending this email template with all emails:
8. Up at the top just beneath where it says Signature settings, make sure that the top box is CHECKED � the one that says "Add signatures to all outgoing messages." Also, make sure the box beneath it is UNCHECKED � the one that says �Don�t' add signatures to Replies and Forwards."
If you are sending this email template only with some emails:
8. Up at the top just beneath where it says Signature settings, make sure that the top box is UNCHECKED � the one that says "Add signatures to all outgoing messages." Also, make sure the box beneath it is UNCHECKED � the one that says �Don�t' add signatures to Replies and Forwards."
9. Next, click the SEND tab at the top of the OPTIONS dialog box. You'll see:
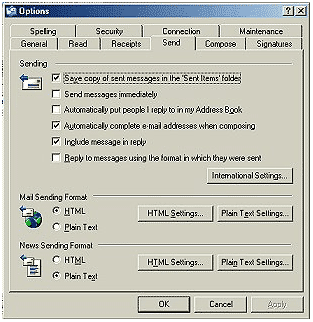
10. Make sure that the sixth checkbox down, the one called "Reply to messages in the format in which they were sent" is NOT CHECKED.
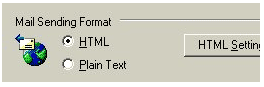
11. Under the section labeled "Mail Sending Format" click the button called HTML Settings. You'll see:
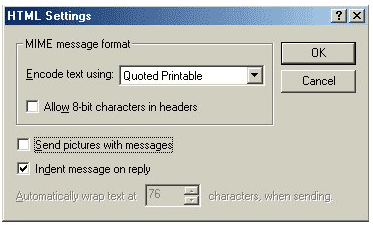
12. You need to make sure that the option "Send Pictures with Messages" is NOT CHECKED.
Click OK in this dialog box.
13. Now, in the SEND tab, make sure that the Mail Sending Format is set to HTML.
14. Finally, click Apply and then OK at the bottom of the Options dialog box.
For Users of Outlook Express Version 4 or Outlook Express 97 only:
- On the Tools menu option at the top, click Stationery.
- Pull down to the Mail tab, then click Signature.
- In the signature window select a signature file to use for all outgoing messages, then click Browse and locate the file that you saved in step #1
- To use your stationery when composing or replying to a message, click insert (with your cursor down in the text window) and pull down to Signature. Your stationery will show up for you to type on.
To send an email with the signature:
To use your stationery when composing or replying to a message, click insert (with your cursor down in the text window) and pull down to The Name of Your Signature. Your stationery will show up for you to type on.
